16 bit mode in Photoshop.
Preserving Image quality using 16 bit mode in Photoshop
I would like to share a method I use in my retouching which minimises loss in quality when making adjustments to processed image files in Adobe Photoshop.
I don’t know if any other retouchers use this method, but I haven’t come across it anywhere else.
16 bit mode v 8 bit mode
A digital image does not show a smooth graduation of tones from light to dark, but a series of steps. These steps are so small that they appear as a smooth graduation to the human eye. When in RGB mode 8 bit is sometimes called 24 bit, as it is 8 bits for each of the three colour channels (3×8=24), or 32 bit if using 4 colour channels in CMYK (4×8=32).
You may have noticed that black in Photoshop has a numeric value of 0, and white has a numeric value of 255. This gives us 256 steps, as the first step is 0 and not 1. For the mathematicians among you 2x2x2x2x2x2x2x2=256. There are eight 2s in that sum, which gives us a bit depth of 8.
16 bit mode gives us many more steps (65536 for each colour channel rather than 256). This will visually look no different to the human eye, but will double the size of your file, making it slower to work with, and using up twice the amount of Hard Drive space.
So What’s the Point of 16 Bit Mode?
The whole point of 16 bit mode is that it minimises quality loss when making adjustments to colour, brightness, levels, curves etc. This will show in your image where there are graduations that don’t run smoothly.
To illustrate this point there are 2 images below. The first image has had a large adjustment made to the levels in 8 bit mode, then I’ve tried to get back to the original image with another levels adjustment in 8 bit mode, resulting in a loss of quality (fig.1).
The second image shows the original file without any loss in quality (fig.2).
Looking particularly at the bottom right hand quadrant, you can see blotches on fig.01, where there should be a smooth graduation.
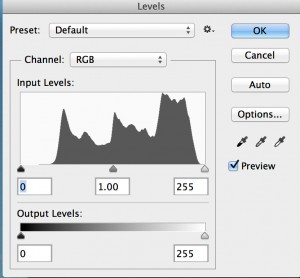
This loss in quality can be seen more clearly when looking at the histogram. The better quality image is represented by the histogram as seen in the levels pallet (fig.03). Note the smoothness to the graphs curve.
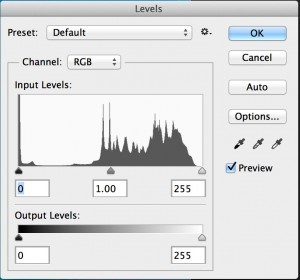
And here’s the histogram from the poorer quality image. Note the sharp peaks and troughs in the graphs curve (fig.04).
Here’s the important point; a 16 bit image is no better quality than an 8 bit image, unless you’re going to make adjustments.
The more common way of working
The more common way of working is to convert to 16 bit mode, make the necessary adjustments, and then convert back to 8 bit mode.
My variation on this
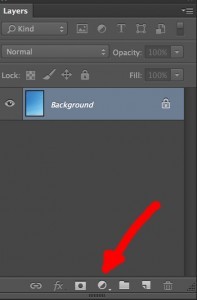
I always prefer to work with adjustment layers, which can be accessed via the layers pallet (fig.05).
Adjustments can be made in 8 bit mode, as they are not applied to the image, but live on a separate layer.
Once you have built up all the adjustment layers you need, you can convert to 16 bit mode, flatten the image and convert back to 8 bit mode. Although this is a very simple three steps I would recommend recording an Action for it (see previous blog). I have one in my Actions pallet, which I call “Flat 16”. It allows an image to be flattened at a high quality, with a single click, and is an action I use regularly.
My Workflow Ideas
I usually store two versions of retouched images. The first one is a flattened image, as described above, and usually the version supplied to the client. The second version is a .psd file, with all the layers. This gives me the flexibility to make any additional adjustments more easily.
Final Point
Using 16 bit mode as described above, has a definite quality benefit, but you can still do better, making adjustments to RAW files where possible. I will always get as close as possible to the perfect image by utilising the flexibility inherent in RAW files. Photoshops editing capabilities are more comprehensive than processing sofware, which is why I often use the above method. This difference is however, getting smaller and I can’t help speculate that tonal adjustments to RAW files will one day be as good.
As usual, any relevant comments on this blog are very welcome.


